Using Auth0 with role-based authorization in ASP.NET Core
Introduction
Authentication and authorization are always an interesting topic in the world of web development. When developing web applications, at some point you’re bound to have a situation where users need to be able to log in to your app. Subsequently, when users log in to your app, at some point you’re bound to have a situation where only specific users are allowed to access specific parts of your app.
In ASP.NET Core, there are several identity management solutions available to choose from. One of these solutions is Auth0.
Auth0 is a comprehensive cloud-based authentication, authorization and user management solution. It has both B2C and B2B options, as well as a generous free tier.
When using Auth0 as your identity management solution in ASP.NET Core applications, you might want to assign roles to users in Auth0 and propagate those to your ASP.NET Core application. This blog post explains how to set-up your Auth0 tenant so that ASP.NET Core will be able to automatically capture the roles onto the .NET claims-based identity so you can create role-based policies.
Disclaimer: This blog post is not sponsored or supported by Auth0 in any way. Everything I mention about Auth0 and ASP.NET Core is my own opinion and experience and does not reflect the Auth0 or .NET communities.
TL;DR
This blogpost is a comprehensive post about setting up an ASP.NET Core application and Auth0 tenant from scratch. If you’re only interested in the part where we configure Auth0 to pass the assigned role to the .NET application, please take a look at the chapter: Writing an Auth0 post-login Action and optionally at the preceding chapter: Creating pages in .NET only authenticated and authorized users can visit.
In order to use ASP.NET Core’s built-in role-based-authorization in conjunction with Auth0, we can leverage Auth0’s post-login actions to set Microsoft’s role claim value to the assigned user’s roles. This allows for clean management of users and roles in Auth0 whilst still retaining full out-of-the-box support in ASP.NET Core with roles.
Table of contents
- Introduction
- TL;DR
- Table of contents
- Setting up our ASP.NET Core project
- Setting up our Auth0 tenant and application
- Integrating our .NET project with Auth0
- Creating UI support for logging in and out
- Creating pages in .NET only authenticated and authorized users can visit
- Assigning a role to our user in Auth0
- Writing an Auth0 post-login Action
- Testing our .NET application
- Wrapping up
- References
Setting up our ASP.NET Core project
For simplicity this blog post will focus on setting up identity management with an ASP.NET Core Razor Pages project. However, everything mentioned applies to ASP.NET Core MVC and ASP.NET Core Blazor applications as well.
All development in this blog post by me is done using Visual Studio Code and the .NET CLI on WSL2 with the .NET 9 SDK.
Let’s go ahead and set up our project!
First we’re going to create a new ASP.NET Core Razor Pages project by running: dotnet new webapp --name auth0-aspnet-demo. After this has been created, go ahead and open the newly created folder in Visual Studio Code (code ~/auth0-aspnet-demo).
Verify everything works as expected and you can run the project by running: dotnet run in your project folder. Your console should output some logging and a URL should be presented like so:
alex@PC-ALEX:~/auth0-aspnet-demo$ dotnet run
Using launch settings from /home/alex/auth0-aspnet-demo/Properties/launchSettings.json...
Building...
warn: Microsoft.AspNetCore.DataProtection.KeyManagement.XmlKeyManager[35]
      No XML encryptor configured. Key {91ddaa99-57ac-44a4-9656-7bf833735c45} may be persisted to storage in unencrypted form.
info: Microsoft.Hosting.Lifetime[14]
      Now listening on: http://localhost:5203
info: Microsoft.Hosting.Lifetime[0]
      Application started. Press Ctrl+C to shut down.
info: Microsoft.Hosting.Lifetime[0]
      Hosting environment: Development
info: Microsoft.Hosting.Lifetime[0]
      Content root path: /home/alex/auth0-aspnet-demo
Open your browser and navigate to the presented URL (or CTRL+Click) to verify you can see the new Razor Pages project looking something like this:

Perfect! For simplicity’s sake, we’ll keep everything as-is. If you’d like to customize your application and its styling, feel free to do so however!
Now that we’ve set up our Razor Pages project, let’s head over to Auth0 to set up our tenant!
Setting up our Auth0 tenant and application
Head over to https://auth0.com and log in or sign up. Select the tenant you want to apply this to or create a new one.
I’m on a free plan with my Auth0 tenant.
I’m not going into details on how to set up a new tenant in Auth0 or what a tenant is exactly. If you’d like more information about this, please view Auth0’s Get Started documentation.
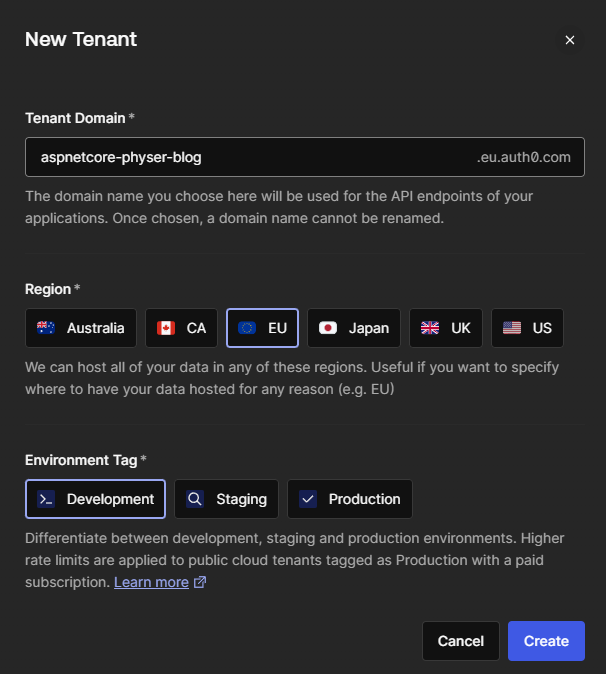
For demo purposes, I have created a new tenant in the EU with the Development environment tag:
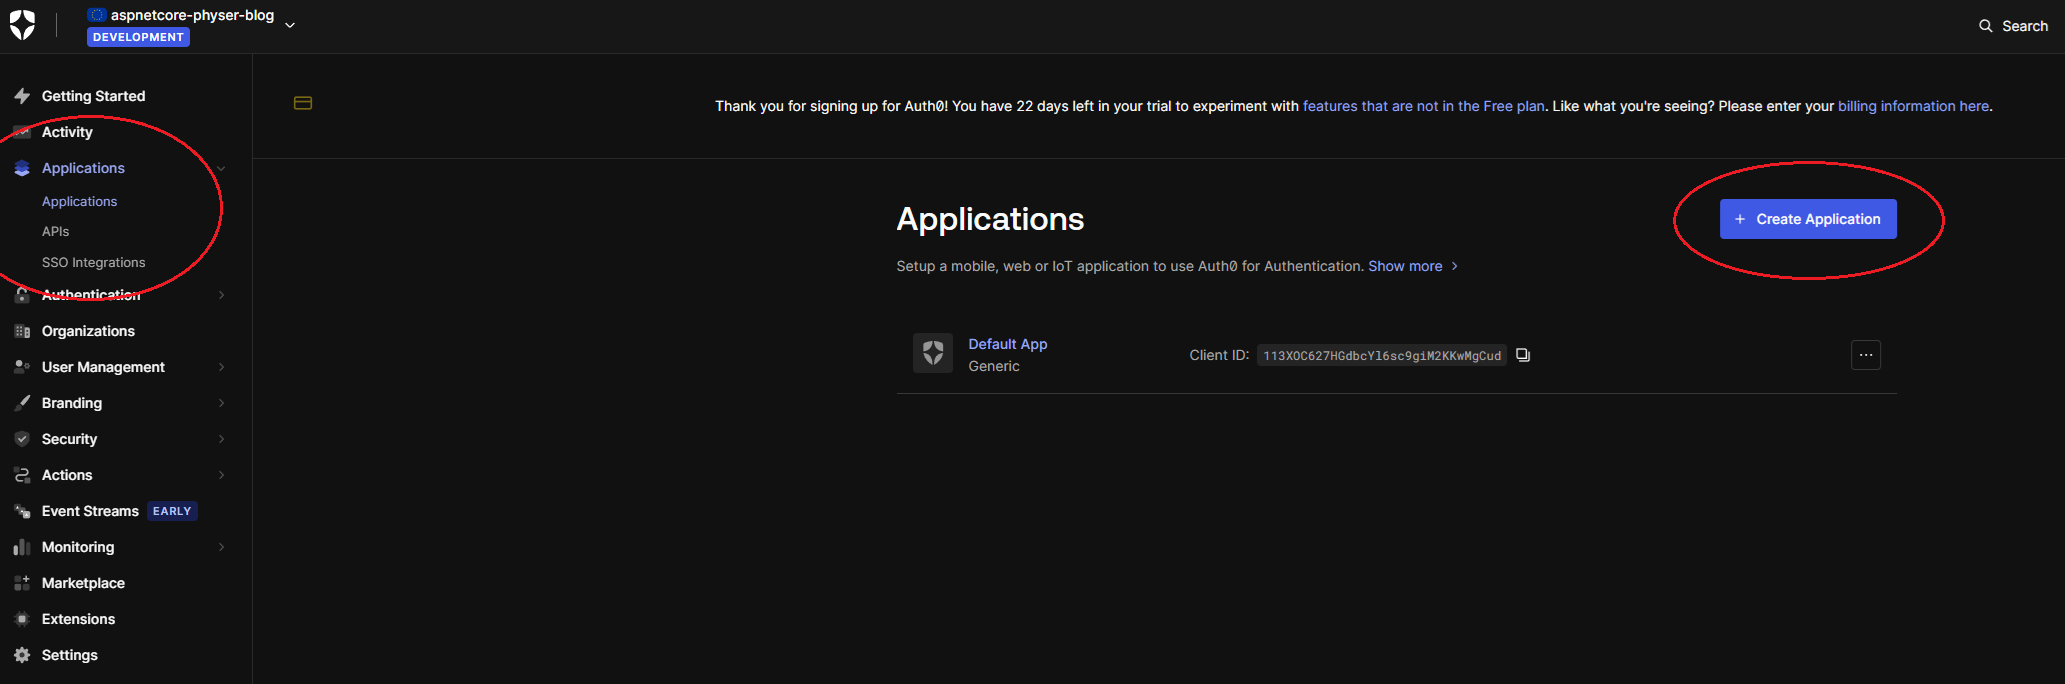
Once your tenant has been created, head over to the Applications tab in the sidebar and select the Applications sub navigation item. Once you’re on the applications page, create a new application by pressing the button: + Create Application:
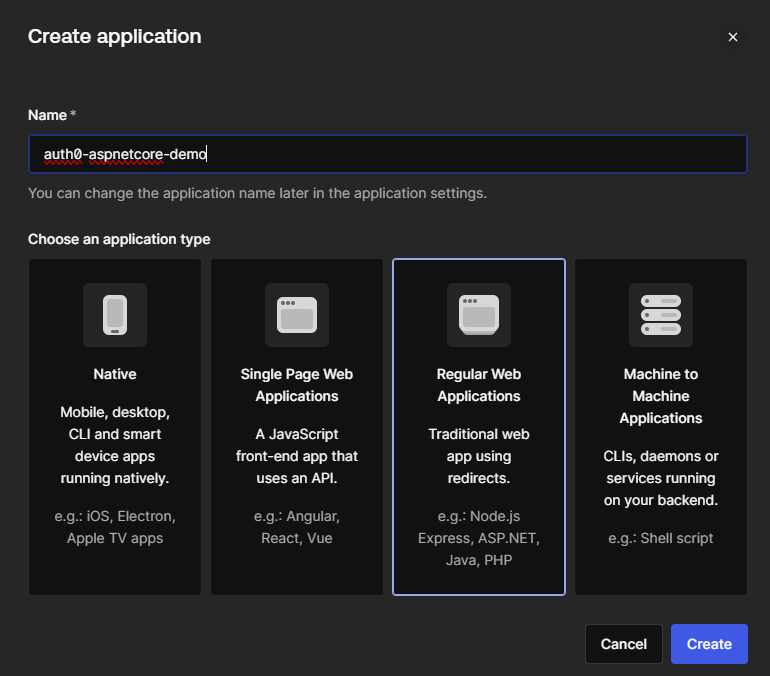
Select the desired type of application, in case of this example: Regular Web Applications and click on create:
Feel free to open the Quickstart for ASP.NET Core MVC or follow along with this post to fully set up your tenant for local use.
Switch to the Settings tab at the top of the page and scroll down until you find the Application URIs section.
Copy the URL from your running local .NET application that you created in the previous step and add /callback to it. Add this URL to the Allowed Callback URLs. If your application is running on multiple URLs (e.g. HTTP and HTTPS), you can add multiple URLs in Auth0 by comma-separating them.
In my example, the Allowed Callback URL will be: http://localhost:5203/callback.
Add the URL(s) (without a path) in the Allowed Logout URLs field. In my example, that would be: http://localhost:5203.
This will result in your settings looking something like this:
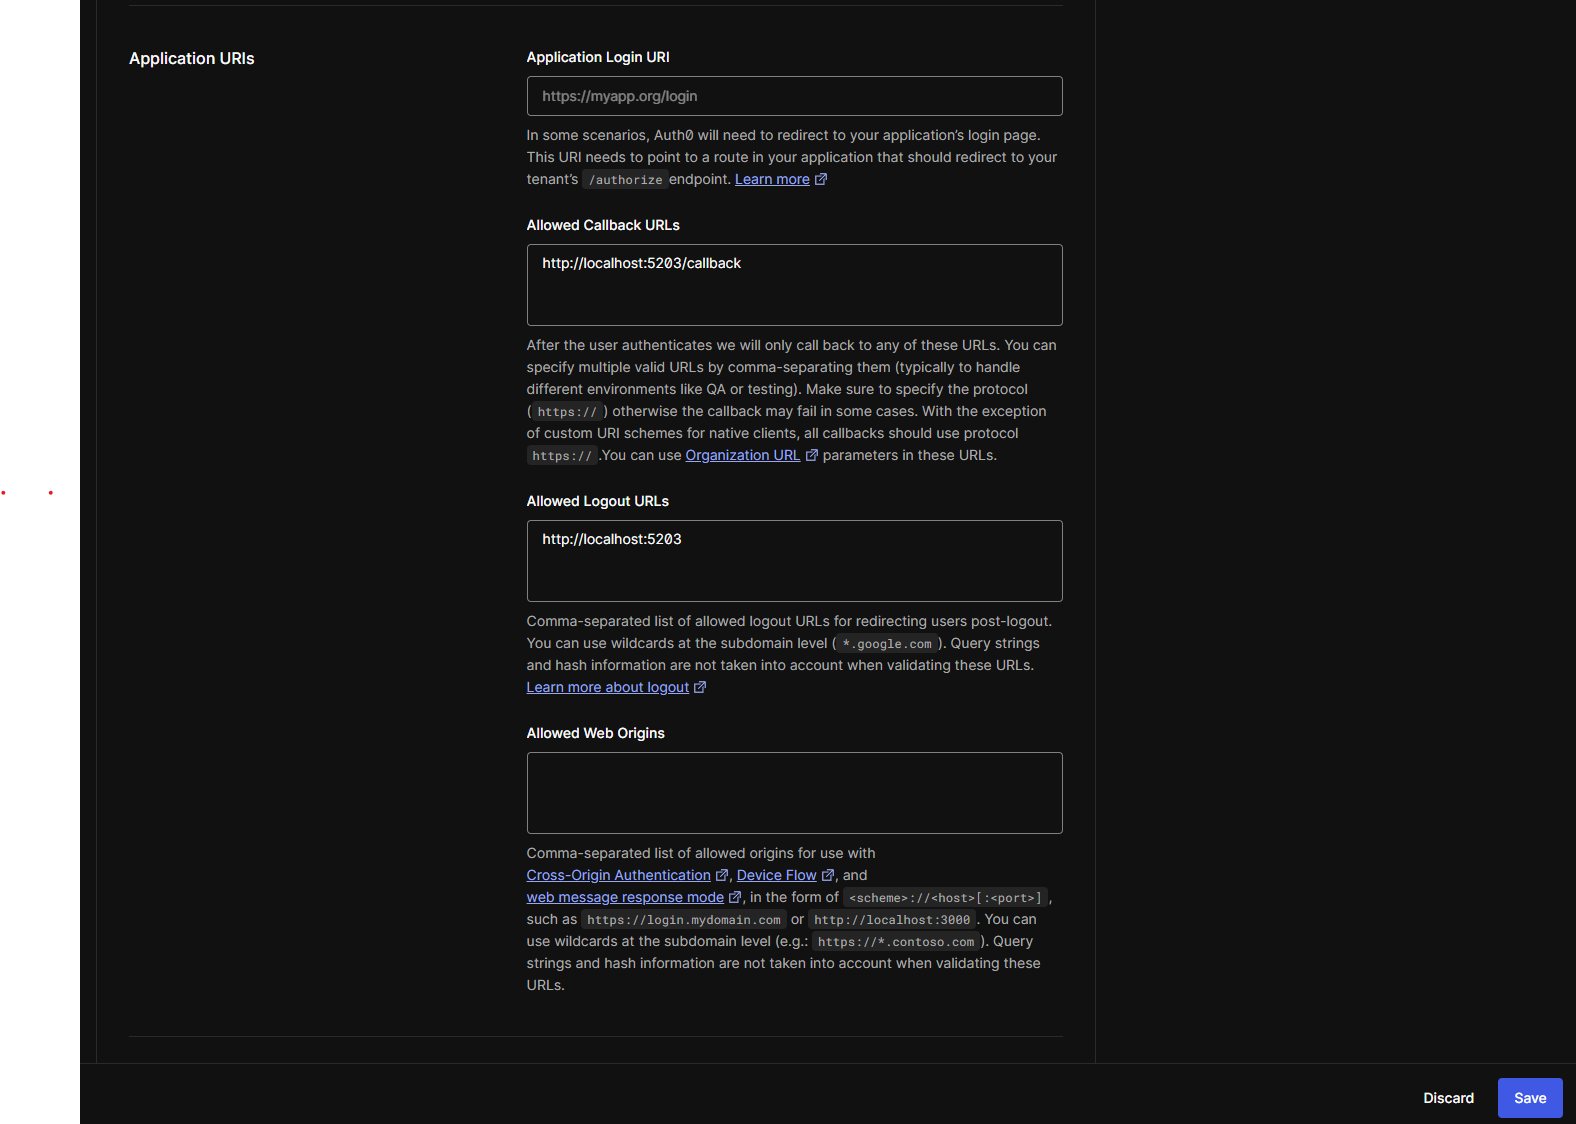
Don’t forget to smash the save button in the bottom!
That concludes the necessary set up for our Auth0 tenant and application. Let’s switch back to our .NET project to set up the integration with the Auth0 SDK!
Integrating our .NET project with Auth0
Now that we’ve got our Auth0 tenant set up and our Auth0 application configured, let’s get back to our .NET project and set up things from that side.
Install the Auth0 SDK for .NET by running dotnet add Auth0.AspNetCore.Authentication in your previously created folder (e.g. ~/auth0-aspnet-demo).
Configure the .NET project to support Auth0’s authentication provider by updating your Program.cs with the following code:
builder.Services.AddAuth0WebAppAuthentication(options =>
{
    options.Domain = builder.Configuration["Auth0:Domain"] ?? throw new InvalidOperationException("Auth0:Domain configuration is missing.");
    options.ClientId = builder.Configuration["Auth0:ClientId"] ?? throw new InvalidOperationException("Auth0:ClientId configuration is missing.");
});
As you can see from the preceding code, the necessary Auth0 tenant settings are retrieved from the appsettings.json. Open the appsettings.json file and add the Domain and ClientId. You can find these values on the Settings page of your application in Auth0:
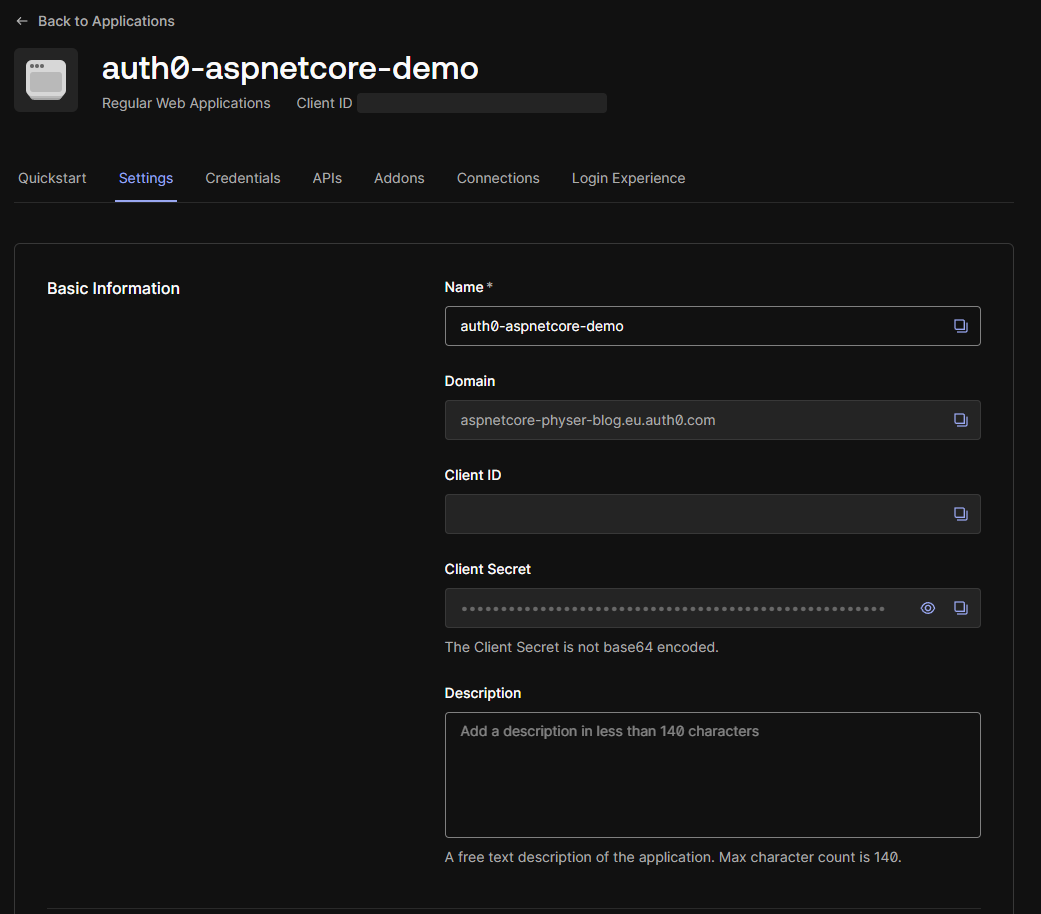
Whilst these values aren’t secret, they are sensitive information. Please be sure to use care when checking these details into a version control system. Where necessary, use User Secrets for local development and a proper secret management tool for Cloud development such as Azure Key Vault.
For demo purposes, I’m simply going to add them to our appsettings.json but be sure to not publish your settings online like that.
Your appsettings.json file should now look like this:
{
  "Logging": {
    "LogLevel": {
      "Default": "Information",
      "Microsoft.AspNetCore": "Warning"
    }
  },
  "AllowedHosts": "*",
  "Auth0": {
    "Domain": "aspnetcore-physer-blog.eu.auth0.com",
    "ClientId": "xxxxxxxxxxxxxxxxxxxxxxxxxxxxxxxx"
  }
}
My ClientId has been redacted in the examples, make sure to fill in your details properly when following along with this blogpost.
Verify everything is still working correctly by running your program and navigating to your application (dotnet run).
Cool! Our ASP.NET Core application is now integrated with the Auth0 SDK. In the next stage we will create a way to log in and out of the ASP.NET Core application.
Creating UI support for logging in and out
So we’ve set up our Auth0 integration, great! It won’t do us much good though until we’ve set up a way to authenticate. We need to be able to log in (and out, preferably) through our ASP.NET Core application.
Let’s switch back to Visual Studio Code and head over to the Program.cs file, the entry point of our application.
Near the bottom of the file you can spot a line containing: app.UseAuthorization();. Add the following line above it: app.UseAuthentication();. This sets our application up to not only use authorization policies but also support authentication.
This means your Program.cs file now looks something like this:
using Auth0.AspNetCore.Authentication;

var builder = WebApplication.CreateBuilder(args);

// Add services to the container.
builder.Services.AddRazorPages();

builder.Services.AddAuth0WebAppAuthentication(options =>
{
    options.Domain = builder.Configuration["Auth0:Domain"] ?? throw new InvalidOperationException("Auth0:Domain configuration is missing.");
    options.ClientId = builder.Configuration["Auth0:ClientId"] ?? throw new InvalidOperationException("Auth0:ClientId configuration is missing.");
});

var app = builder.Build();

// Configure the HTTP request pipeline.
if (!app.Environment.IsDevelopment())
{
    app.UseExceptionHandler("/Error");
    // The default HSTS value is 30 days. You may want to change this for production scenarios, see https://aka.ms/aspnetcore-hsts.
    app.UseHsts();
}

app.UseHttpsRedirection();

app.UseRouting();

app.UseAuthentication();
app.UseAuthorization();

app.MapStaticAssets();
app.MapRazorPages()
   .WithStaticAssets();

app.Run();
Reminder: Authentication is the process of determining the validity of a user’s identity. Is the user who it says it is? Whereas authorization is the process of verifying the access of a user. Once a user is identified, is it allowed to do what it’s trying to do?
For simplicity, I’m going to create a new Razor Pages page that takes care of logging the user in and another one that takes care of logging the user out. This is not the only way to this though, you could also set up minimal API endpoints.
Let’s add a new empty Razor page and its code-behind file. Run touch Pages/Login.cshtml & touch Pages/Login.cshtml.cs
Open up your Login.cshtml file and add the following lines:
@page
@model LoginModel
Next, add the following code to your Login.cshtml.cs file:
using Auth0.AspNetCore.Authentication;
using Microsoft.AspNetCore.Authentication;
using Microsoft.AspNetCore.Mvc.RazorPages;

namespace auth0_aspnet_demo.Pages;

public class LoginModel : PageModel
{
    public async Task OnGetAsync()
    {
        var authenticationProperties = new LoginAuthenticationPropertiesBuilder().WithRedirectUri("/").Build();
        await HttpContext.ChallengeAsync(Auth0Constants.AuthenticationScheme, authenticationProperties);
    }
}
If you’re following along with the tutorial, verify your namespace and usings are correctly set.
Let’s see if it worked! Run your application (dotnet run) and navigate to your URL. Go to /login and you should be redirected to Auth0. Register as a new user or log in as an existing one if you already have an account in Auth0. Afterwards, you should be redirected back to your application!
If you run into an error in the Auth0 redirecting process, ensure your callback URL matches the URL you’re visiting, for instance if you’ve set up Auth0 to accept
http://localhost:5203/callback, and you’re onhttp:127.0.0.1:5203/callback, Auth0 will not accept the URL.
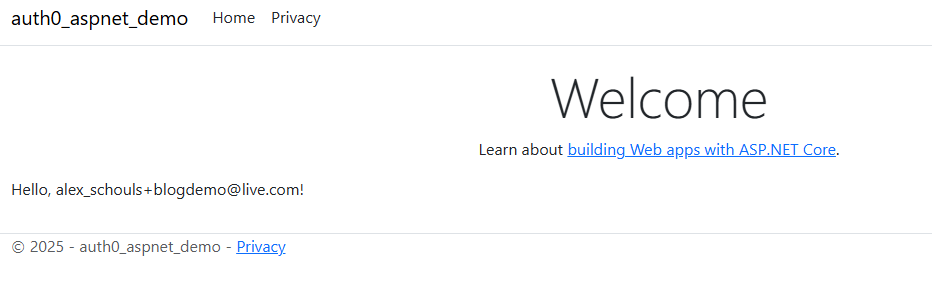
To verify we’re actually logged in as a user we can quickly update our homepage to show some data of the logged in user.
Open up your Pages/Index.cshtml file and below the existing code add the following:
@if (User.Identity?.IsAuthenticated == true) {
<p>Hello, @User.Identity.Name</p>
}
Run your application and if you’re still logged in (you might have to login again by navigating to the /login page), you should see your e-mail address pop up like so:
Let’s also quickly add a page to log out from the application. We will create a page similar to the login page, except now it will log you out. Run touch Pages/Logout.cshtml & touch Pages/Logout.cshtml.cs (or create them in any way you’d like).
Open Pages/Logout.cshtml and add the following lines:
@page
@model LogoutModel
Next, open up the code-behind: Pages/Logout.cshtml.cs and add these lines:
using Auth0.AspNetCore.Authentication;
using Microsoft.AspNetCore.Authentication;
using Microsoft.AspNetCore.Authentication.Cookies;
using Microsoft.AspNetCore.Mvc.RazorPages;

namespace auth0_aspnet_demo.Pages;

public class LogoutModel : PageModel
{
    public async Task OnGetAsync()
    {
        var authenticationProperties = new LogoutAuthenticationPropertiesBuilder().WithRedirectUri("/").Build();
        await HttpContext.SignOutAsync(Auth0Constants.AuthenticationScheme, authenticationProperties);
        await HttpContext.SignOutAsync(CookieAuthenticationDefaults.AuthenticationScheme);
    }
}
Ensure you’re signing out of both the Auth0 authentication scheme and the Cookie authentication scheme and spin up your application to test it out!
First /login as a user, head over the homepage to verify you’re logged in and then navigate to /logout. If you head over to the homepage after logging out (you should already be there since you get redirect to it) you won’t see your user information anymore.
The logging out process can happen very quickly, don’t be surprised if you don’t notice a lot happening. At the very least the user information should be gone from the homepage though.
Awesome! We can log in using Auth0 as an identity management platform and we can see that it’s tied into the .NET ecosystem by simply reading from the User object available in the .NET SDK. Now let’s create some pages that only logged in (and privileged) users can access.
Creating pages in .NET only authenticated and authorized users can visit
Okay, now that we’re able to log in (and out) as a user, let’s set up some pages that only (privileged) users can access.
Let’s create a page only an authenticated user can access, regardless of their roles and rights. We’ll create a page and its code-behind like so: touch Pages/Authenticated.cshtml & touch Pages/Authenticated.cshtml.cs.
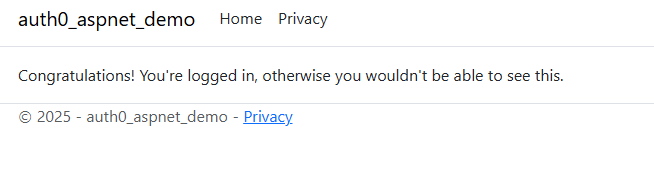
Open up the Pages/Authenticated.cshtml file and add the following lines:
@page
@model AuthenticatedModel
@{
    ViewData["Title"] = "A very secure page";
}

<div>Congratulations! You're logged in, otherwise you wouldn't be able to see this.</div>
Next, open its code-behind (Pages/Authenticated.cshtml.cs) and add these lines:
using Microsoft.AspNetCore.Authorization;
using Microsoft.AspNetCore.Mvc.RazorPages;

namespace auth0_aspnet_demo.Pages;

[Authorize]
public class AuthenticatedModel : PageModel;
There are different ways of setting authentication and authorization conventions in ASP.NET Core Razor Pages but for simplicity, we are creating an empty page model here to decorate it with the proper attribute.
Now to verify it works, run your application. Make sure you’re logged out by navigating to the /logout URL and try to navigate to the /authenticated URL. You will probably end up on a 404 with a weird URL saying something like /Account/Login?ReturnUrl=%2Fauthenticated. Don’t worry about this for now, this is simply because we haven’t configured the URL unauthorized users will land on. Log in by navigating to the /login URL and try to go to the /authenticated URL again. You should now be able to access the page and see something like this:
Now that we have a page that every authenticated user can access, let’s add a page that only a user in a specific role can access. This is called role-based authorization in ASP.NET Core.
We’ll create a page that only users that belong to the Admin role can access. Remember the name of this role, we’ll need this later in Auth0. Let’s create an admin page: touch Pages/Admin.cshtml & touch Pages/Admin.cshtml.cs.
Open the Pages/Admin.cshtml file and add:
@page
@model AdminModel
@{
    ViewData["Title"] = "Area 51";
}

<div>Wow, you're an admin! So cool!</div>
Then open up the code-behind (Pages/Admin.cshtml.cs) and add:
using Microsoft.AspNetCore.Authorization;
using Microsoft.AspNetCore.Mvc.RazorPages;

namespace auth0_aspnet_demo.Pages;

[Authorize(Roles = "Admin")]
public class AdminModel : PageModel;
Notice how we have specified a specific role in our [Authorize] attribute. Now only users that will have the Admin role as a specific claim will be able to access this page.
At this point in time we are not yet able to assign an Admin role to our user. We will take care of that in the next chapter. We can, however, verify a ‘regular’ logged-in user does not have access to this page.
Run your application, verify you’re logged in by navigating to the /login endpoint and try to navigate to the /admin page. You should (again) end up on a non-existing URL like /Account/AccessDenied?ReturnUrl=%2Fadmin which is (again) because we haven’t configured the redirects.
As you can see, we can’t access our page even though we’re logged in. We don’t have the proper role assigned to our logged-in user! Let’s fix that in Auth0.
Assigning a role to our user in Auth0
Auth0 offers the capability of creating, managing and assigning roles to users. To do so, head over to the management dashboard of your Auth0 tenant and select the sub item Roles under the User Management menu item on the left-hand side.
Click on the big + Create Role button on the top-right side and enter your role name and description. Remember, in the previous chapter we’ve mentioned how important it is that your role in your code matches the role in Auth0. For us, that means we will enter the name Admin here. Don’t forget to hit Create!

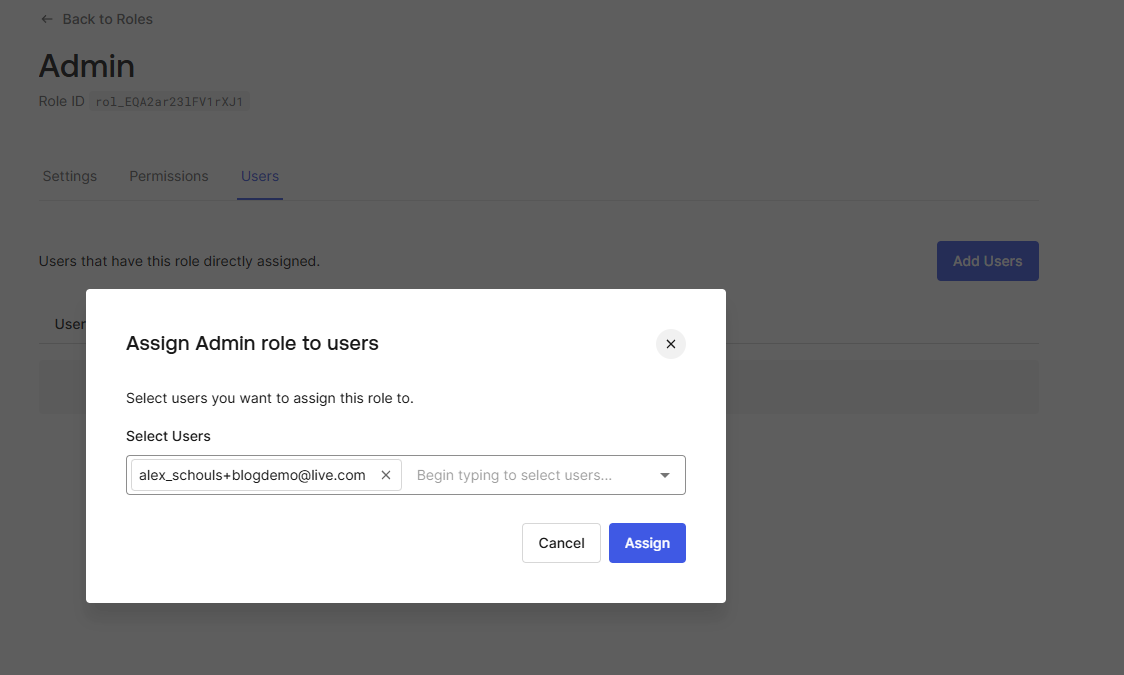
Once our role is created, we can assign it to our user. You can do this through multiple screens in the Auth0 management dashboard but since we’re already on the role details of our Admin role, we’ll do it from there.
Head over to the Users tab on the role details screen of your Admin role. Press Add Users and find the user you’d like to give admin rights. Note you’ll have to type first in order for your user to pop-up. Select the user and press Assign.
Great! We now have a user with an assigned Admin role. However, by default Auth0 does not expose any roles to the ID token that .NET parses for user identification.
This means that we need to be somehow able to pass the role claim to the ID token. Luckily, Auth0 has just the thing for this! We can write custom Actions in Auth0 that can access the Auth0 authentication objects and interact with them.
Writing an Auth0 post-login Action
By default, simply assigning a role to a user does not include the role as a claim on the token that’s passed down to the application.
To achieve this, we can leverage the Auth0 Actions. These Actions are small pieces of JavaScript code that can hook into the Auth0 ecosystem and the user registration and login pipelines.
This is not an in-depth guide about Auth0 Actions. Please view the linked documentation for a more detailed look.
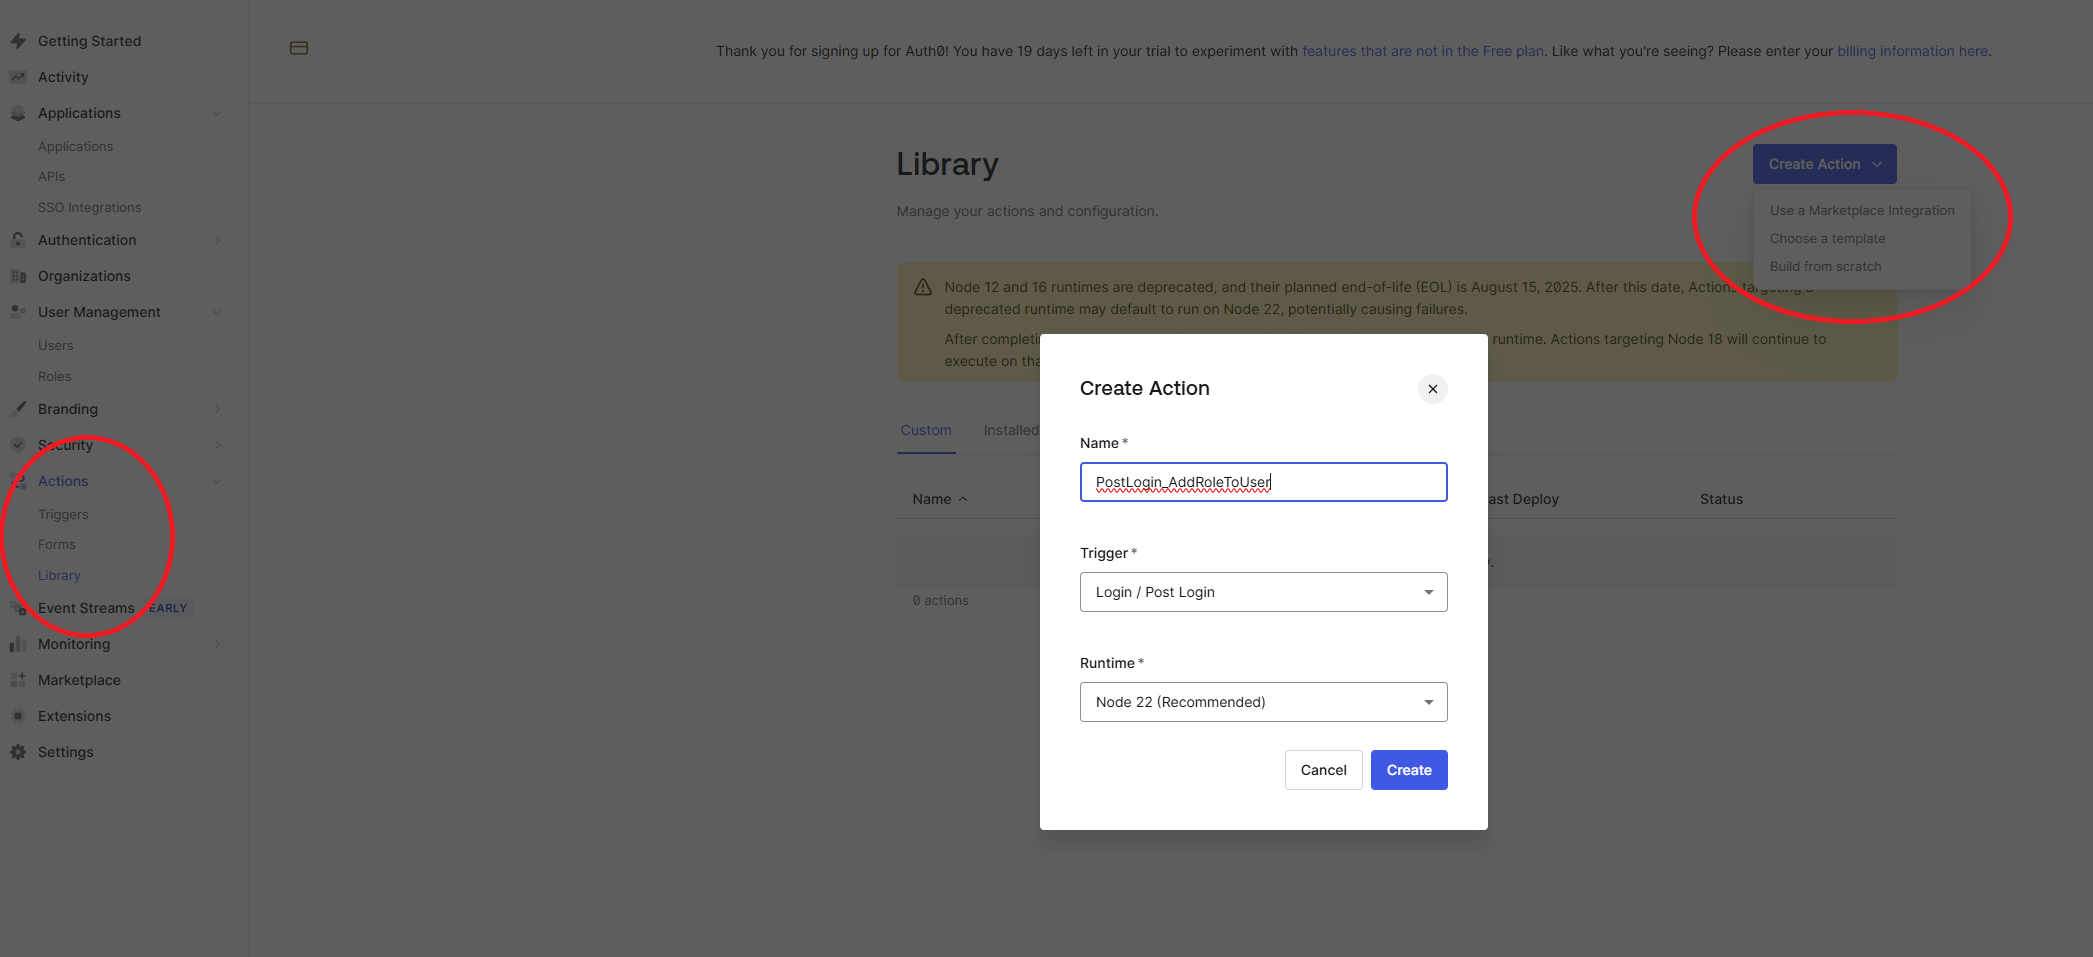
Let’s open up our Auth0 management dashboard and navigate to the Library sub item under the Actions menu item. Once there, on the right-hand side, click the Create Action button and select Build from scratch.
In the popup that opens, fill in a meaningful name (e.g. PostLogin_AddRoleToUser). For trigger make sure you select the Login / Post Login trigger and for the runtime select the recommended runtime (at the time of writing that would be Node v22).
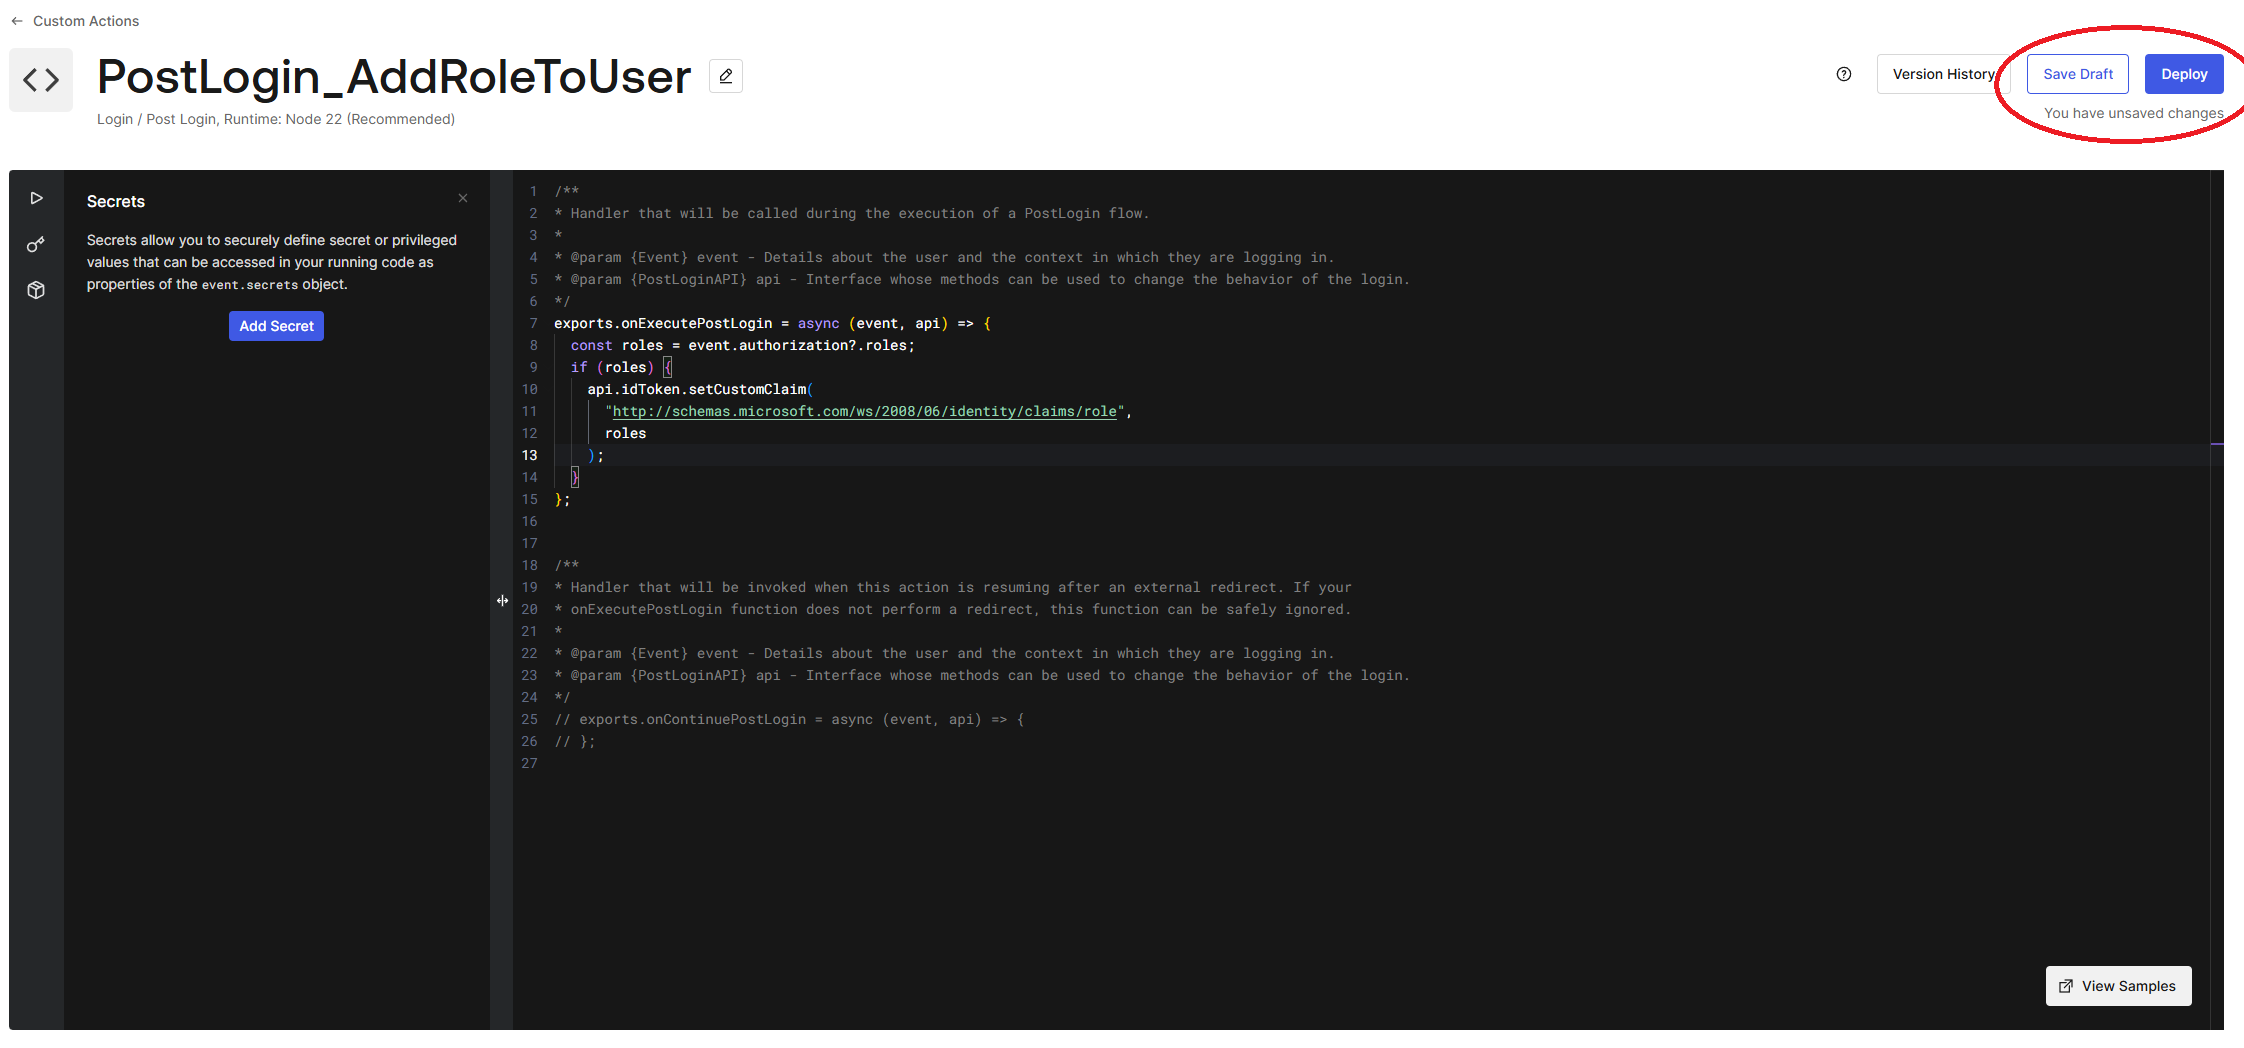
Once you’ve created the trigger, you’ll be redirected to the editing view. Here you’ll get a small template with a single (not commented-out) method in JavaScript with a bunch of comments explaining it:
exports.onExecutePostLogin = async (event, api) => {};
This method can capture Auth0 API objects and interact with them. In our case, we want to set a custom claim on the ID token. However, not just any claim will suffice (unless you’d like to change the .NET code to accept your custom claim, in which case that’s perfectly valid). Since .NET specifically looks at a certain claim name for a role, we can set this as our custom claim in Auth0.
Update the previously mentioned method like so:
exports.onExecutePostLogin = async (event, api) => {
  const roles = event.authorization?.roles;
  if (roles) {
    api.idToken.setCustomClaim(
      "http://schemas.microsoft.com/ws/2008/06/identity/claims/role",
      roles
    );
  }
};
This implementation will set the value of roles, which is an array of assigned roles to the user, to the value of the claim type http://schemas.microsoft.com/ws/2008/06/identity/claims/role. .NET uses this claim to determine the roles for its role-based authorization.
Make sure you save and deploy your newly defined trigger, using the buttons on the top right:
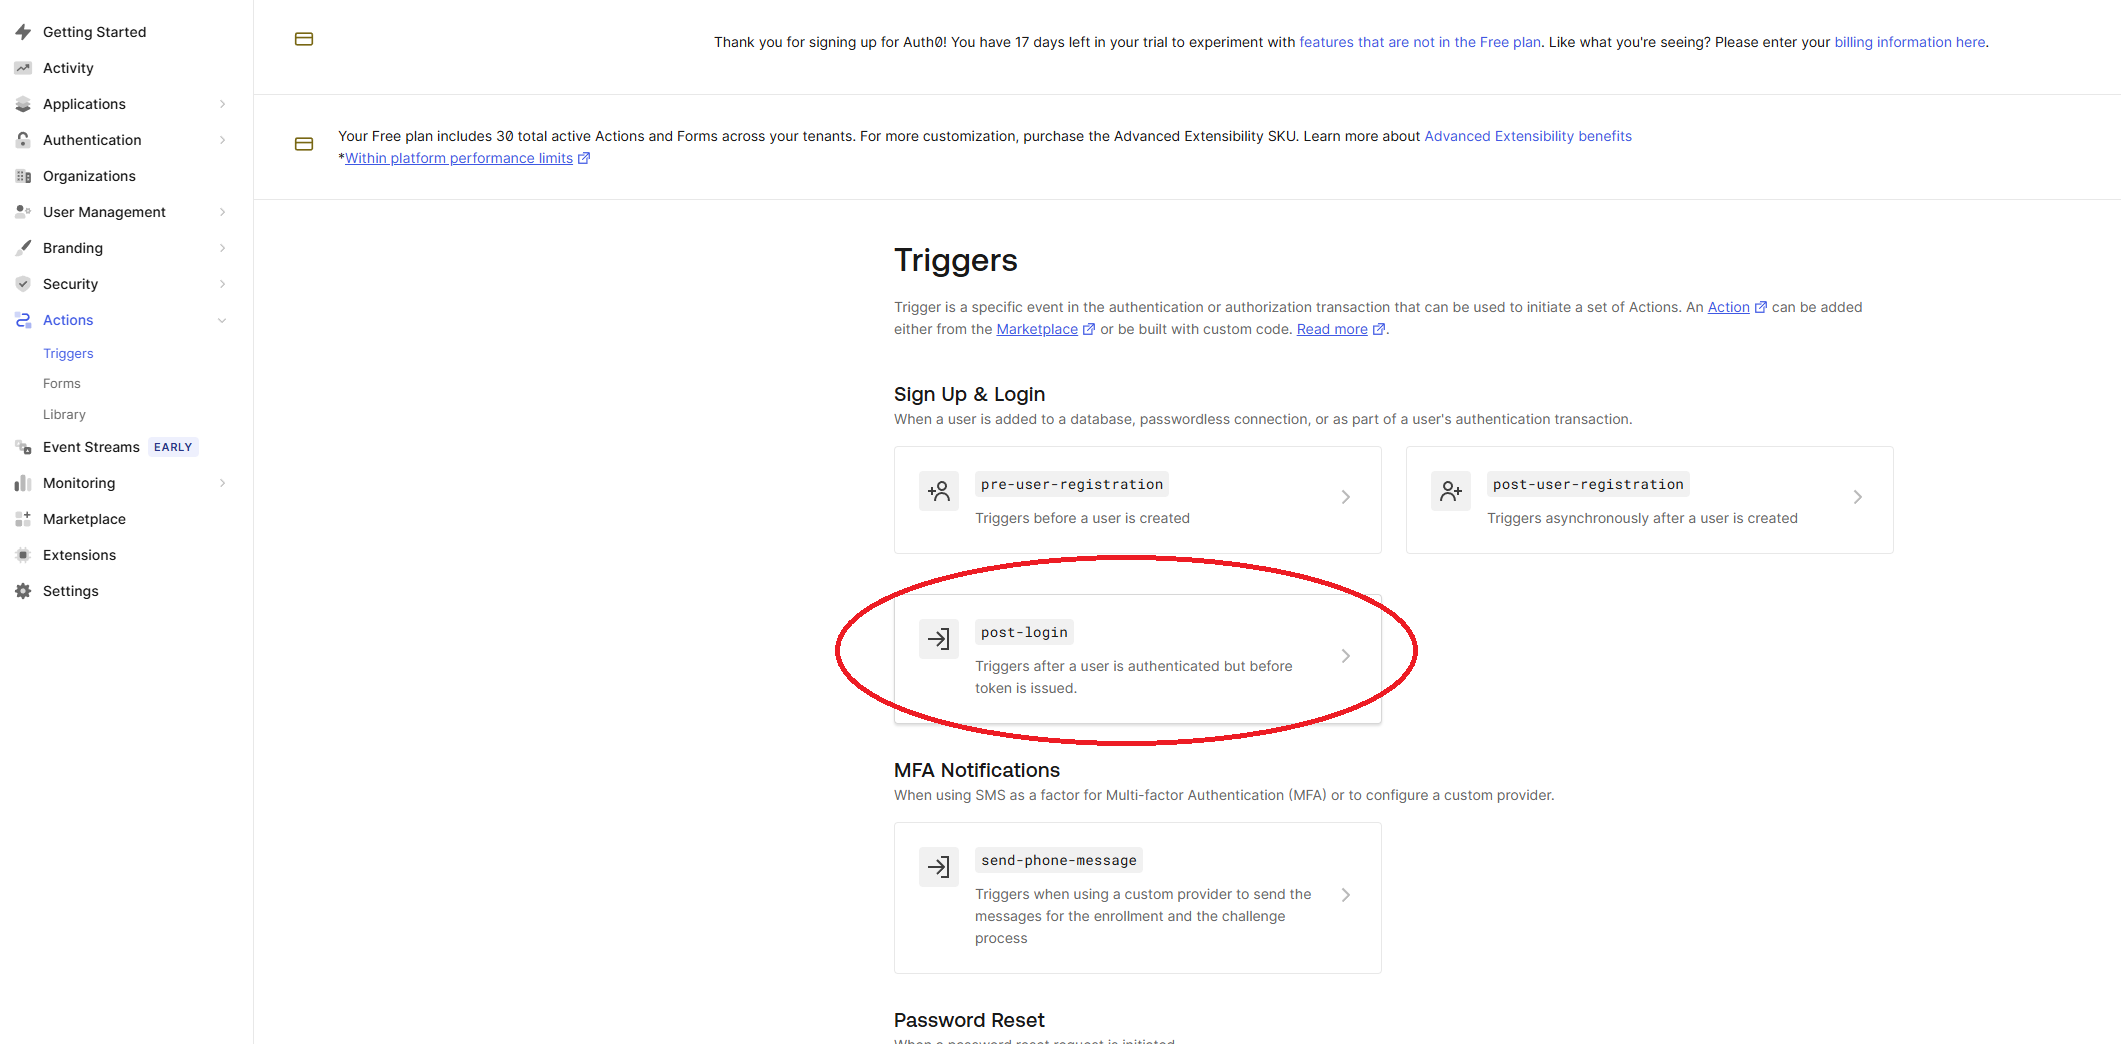
Once our trigger has been deployed to Auth0, we can link it to the post-login pipeline. Head over to the Triggers sub navigation item in the left-hand menu. Select post-login from the Sign up & Login trigger list.
A Post Login flow will pop up. On the right-hand side you can switch to the Custom tab and select your newly deployed trigger. Drag this trigger in between Start and Complete like so:
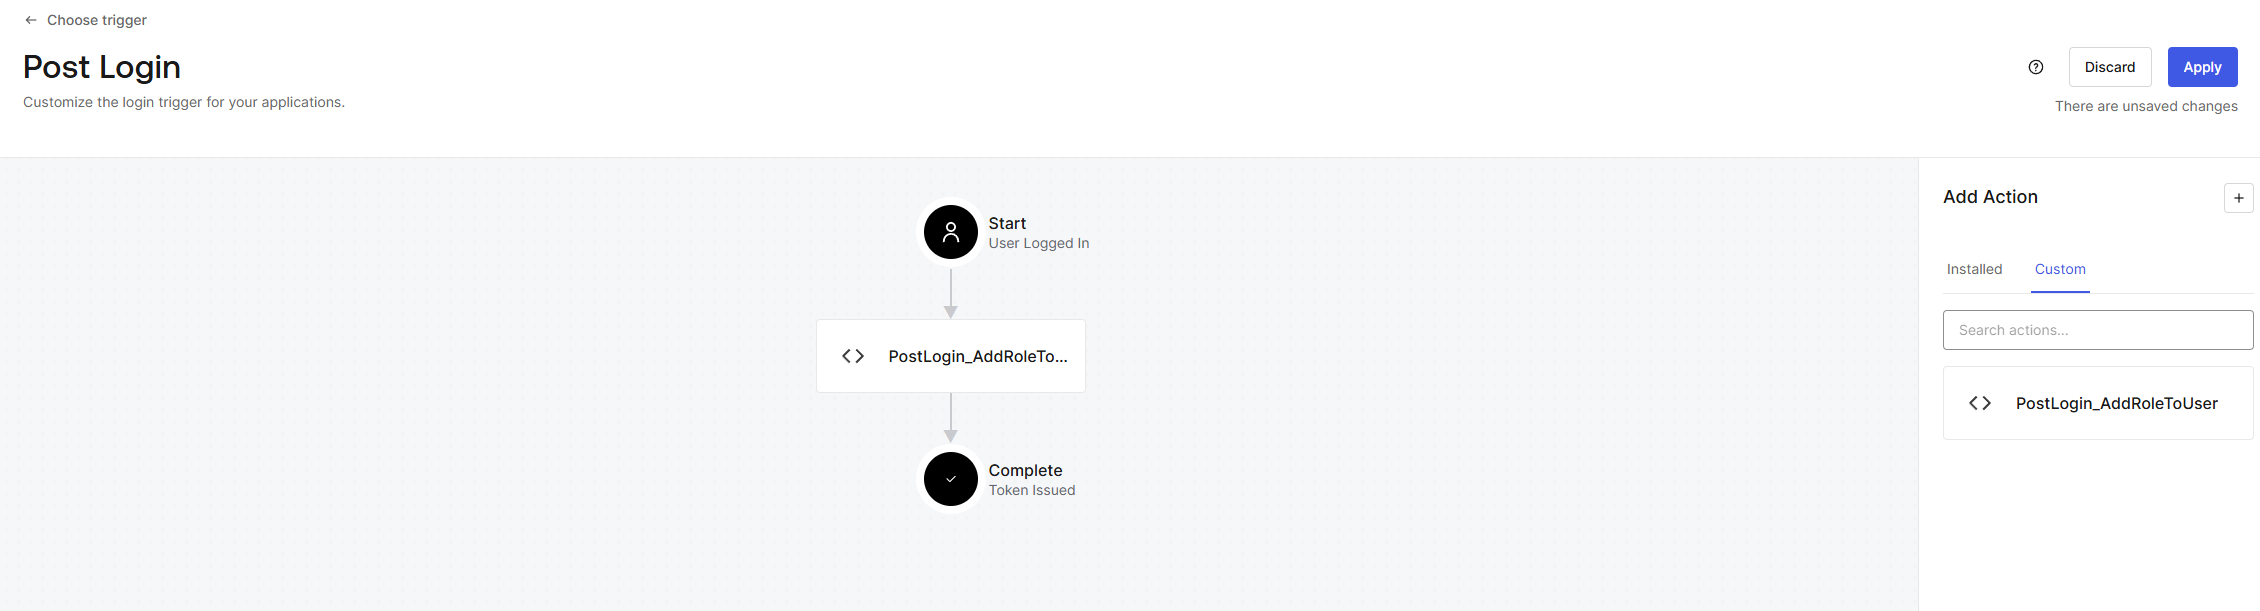
Don’t forget to press the Apply button in the top right!
Now that we’re able to pass the role information in our token, our .NET application will use this information to check on the proper roles.
Testing our .NET application
Let’s head over to our .NET application and run it (dotnet run). Open the application in your browser and make sure you’re logged out by going to the /logout endpoint (after all, the claim is only set when a user logs in - so it has not effect on already logged in users).
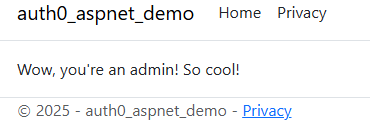
Go to the /login endpoint and log in with your admin account. Once logged in, navigate to the /admin endpoint and you should see a page that says you’re an admin!
If you’d like to test that this works properly with a non-admin user too, feel free to create another user that does not have the role assigned in Auth0 to check it. You won’t be able to access the /admin page anymore with that user.
Note how we haven’t changed anything in our authentication and authorization process in order to make this role-based authorization work! That’s because we use Microsoft’s claim to assign the role.
Wrapping up
In this blogpost you’ve seen how to set-up a .NET application using ASP.NET Core Razor Pages and Auth0 authentication from scratch, implementing .NET’s role-based authorization with a post-login trigger in Auth0.
This way you can easily use Auth0 as your identity management solution without having to resort to writing custom code to sort out your authorization. You can easily assign roles to users in Auth0 and use these in .NET’s built-in role-based authorization mechanism.
I hope this blogpost has been useful to you. Feel free to get in touch with my at my about page if you have any comments, questions or concerns.
As with all my blog posts, the full code is available in the repository of this site: physer.github.io.
References
- Microsoft - Identity management solutions in ASP.NET Core
- Auth0 - Homepage
- Microsoft - .NET Claims API reference
- Microsoft - ASP.NET Core role-based authorization
- Microsoft - ASP.NET Core Razor Pages introduction
- Microsoft - ASP.NET Core MVC overview
- Microsoft - ASP.NET Core Blazor overview
- Auth0 - Getting started
- Microsoft - User secrets in ASP.NET Core
- Microsoft - Azure Key Vault overview
- Auth0 - Management dashboard
- Auth0 - Actions documentation